| |
Taking Up the Hem
There are two types of Hem Marker, as shown in Figs 8 and 9. Both are very easy to use, but one requires pins and the other chalk to mark the hemline. Their individual methods of operation are described below.
Fig 8 - Pin Grip Hem Marker
With the hem bar in the horizontal position, loosen the clamp and position the marker at the desired height, using the measuring scale on the post (from floor level), and lock in position. To mark a hem, place fabric between the plastic clamp, close clamp and insert a pin through the slot near the top of the clamp. Open clamp and repeat exercise at intervals of approximately 5cm around the hem. The calibrations on the gauge can be used to mark the depth of the hem allowance.
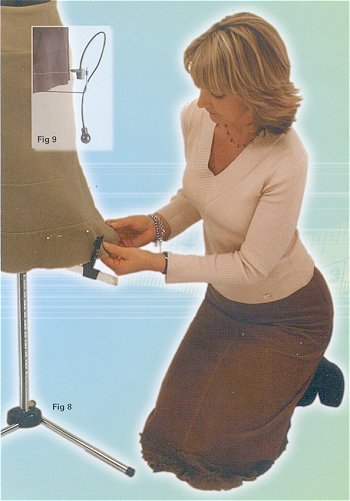
Fig 9 - Chalk Hem Marker
Loosen the clamp and position the marker at the desired height, using the measuring scale on the post, and lock in position. Fill the reservoir at the bottom of the chalk ejector with chalk powder from the sachet provided, and replace cap firmly. Position the metal slide so that the spray nozzle is very close to or just touching the garment. Pressing the bulb, and then moving the marker 10 cm at a time round the garment and pressing the bulb again, will apply a fine line of chalk to create a level hemline, ready for pinning and sewing. Alternatively, turn the chalk ejector 180 degrees so that the Hem Marker can be used to mark a garment you are wearing. Ask your stockist for replacement chalk sachets.
- Tip - Use your dress model and hem attachment for bought garments to avoid paying for the alteration/repair.
Linings
A dress model is your best friend when it comes to lining a garment. Follow the pattern instruction to cut, assemble and sew the lining and turn it inside out. Place it on your dress model, over the garment to be lined. Position it correctly and pin and tack carefully. Remove garment from the model, with lining attached, turn to right side out and replace on model. You will be able to check that the lining is not pulling anywhere, and that it cannot be seen at hemline, cuffs or neck. Turn the garment inside out again and carefully hand sew the lining to the garment.
|
|